
Duck tape wallet
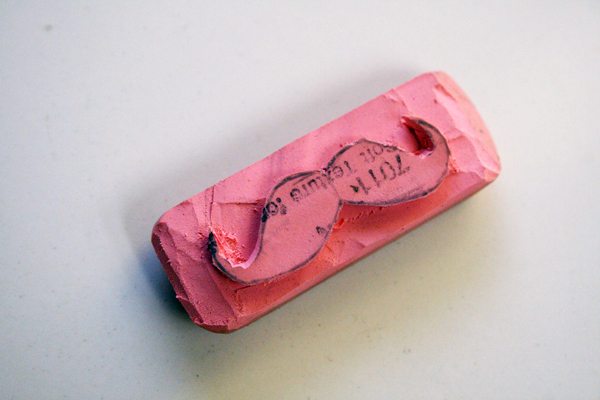
Start by drawing a simple picture on your eraser with pencil. If you mess up, the lead will easily rub off and you can try again. I drew a mustache on one eraser and lips on the other.
Next, take your X-Acto knife and carefully trace around your image, cutting directly downward. You won’t need to get more than about 1/8 of an inch deep.Then, cut in from the edges of the eraser, being careful to only cut up to where you traced the image with the knife. Work your way around in pieces, clearing away the parts that come free, until all of the excess is cut away.
Ta-da! You made a rubber stamp! Now ink it up and stamp away. You could use these for a million things – handmade greeting cards, stamped wrapping paper, funky letterhead, and on and on. It would even be fun to carve a personalized stamp as a gift for a craft-lovin’ friend. Mr. Lovely and I decided to use them on the place cards at our wedding reception – mustaches for boys and lips for girls. Happy stamping! xoxo


Super Cute Bracelet
you will need
- About 5" inches of 1" wide chain–you can get this at most hardware stores
- 2 colors of neon grosgrain ribbon in 1cm width
- 1 color of neon grosgrain ribbon in 1/2cm width
- Scissors
- 2 colors of neon grosgrain ribbon in 1cm width
- 1 color of neon grosgrain ribbon in 1/2cm width
- Scissors
tie ribbons together
Tie the three ribbons together in a knot, leaving about 2" of ribbon at the end.
weave through chain
Use a piece of masking tape to secure the ribbon tails to your work surface, and then weave the thinner ribbon through the center of the chain.
Keep weaving all the way down to the end of the chain.
begin weaving a second ribbon
Grab one of the 1cm pieces of ribbon, and begin looping it in and around the outer edge of the chain, passing around the outside of the link, and then through the middle, right next to where the thinner ribbon is.
loop the last ribbon
When you get to the end of the chain, repeat the same looping on the opposite side with the last ribbon.
knot the ribbons
Once the last ribbon has been woven entirely down the chain, tie off all three ribbons with a secure double knot.
trim the ribbons
Cut the ribbons on the diagonal leaving two inches at the end. Tie the two ends together, and wear with pride!
from teenvogue

xxxxxxxxxxxxxxxxxxxxxxxxxxxxxxxxxxxxxxxxxxxxxxxxxxxxxxxxxxxxxxxxxxxxxxxx
Flower Pony Bead Pin
By: Mia Cronan
Difficulty: Easy
Age: 5 and up
Parental supervision is recommended
This little pin makes a pretty addition to your child's homemade jewelry collection. It's fun to make and helps develop fine motor skills for those wee hands. You can change the colors to anything you like, and mix and match with cute outfits!
Flower Pony Bead Pin
By: Mia Cronan
Difficulty: Easy
Age: 5 and up
Parental supervision is recommended

What you'll need:
- 10 medium-large safety pins
- One safety pin (without a coil)
- 100 pony beads in the following colors: 24 red, 12 yellow, 64 sky-blue
- White towel for laying out beads
- Grid included for flower pattern
How to make it:
- Lay beads out on towel.
- String beads onto safety pins (see photo) as shown in the grid in thisphoto.
- When all ten pins complete, place them on the coil-less safety pin in the order shown.
Tips:
- We added some green beads in one corner to simulate a flower stem.
- You may choose to add a pretty ribbon that coordinates with the colors in the pin.
- We found that picking up the beads with the pin point was easier than trying to place the beads onto the pin.
Mia is a freelance crafter from NE Ohio where she is an at-home mom to five children, ages 4 through 13.
Button Beaded Bracelet
What you'll need:

- A collection of buttons and beads that coordinate nicely together (See photo.)
- Clean white towel for laying out beads
- Jewelry string
- Crimping beads
- End closures
- Spring clips
- Needle-nose pliers
How to make it:
- Lay out the beads and buttons in an attractive pattern.
- Cut approximately 16 inches of jewelry string.
- Securing one end of the jewelry string with a spring clip, string beads and buttons (See photo.) onto string, leaving room at each end for adding end closures (about four inches on each side.) With the buttons, simply come up from the bottom on one side and go down through the other side.
- Adding the closures: String a crimping bead onto one end of jewelry string, string one half of the closure, and then bend the wire, coming back down the opposite way, through the crimping bead. Have an adult crimp it tightly with the needle-nose pliers.
- Secure the other half of the closure on the other side, using the same method. This should create a nice, snug clasp. Snip off excess string from each end.
**************************************
SOMETHING TO DO WITH YOUR OLD FALL PUMPKINS
SNOW MEN
1. PAINT THE PUMPKINS WHITE, LET PAINT DRY
2. STACK TWO OR THREE ON TOP OF EACH OTHER
3. PUT BRANCHES IN FOR ARMS BY MAKING A HOLE WITH A NAIL FIRST
4. PAINT ON EYE'S, MOUTH, BUTTONS AND PAINT THE TOP BLACK
5. USE A SMALL PIECE OF FABRIC FOR THE SCARF
6. PUT A BABY CARROT ON WITH A TOOTH PIC FOR NOSE

**************************************************************************

- Materials
- 9-ounce clear plastic cup
- Silver poster board
- Pinking shears or decorative craft scissors
- Polyester batting
- Miniature trees (sold in craft stores; try the dollhouse or model railroad section)
- Miniature animals or people (sold in craft stores or online at BJCRAFTSUPPLIES.COM)
- 1-inch-wide mirror
- Tacky glue
- Fine glitter
- Pushpin
- Monofilament
- Several craft beads
- Instructions
 Trace the rim of the cup onto the underside of the poster board. Cut out the circle, but stay at least 1/8 inch outside the trace line so the base will be slightly larger than the cup.
 Cut out a circle of batting snow that's the same diameter as the cup and set it atop the shiny side of the poster board circle.
- Separate or snip the batting where you'd like to position the trees, figurines, and mirror pond. Glue the base of each item to the poster board, then smooth or fluff the snow around them as needed. Sprinkle the scene with fine glitter.
- Use the pushpin to poke a hole in the center of the cup bottom. Thread a craft bead onto a 12-inch length of monofilament. Gather the ends together, letting the bead fall to the center of the line, and thread them up through the hole from inside the cup. String a few more beads onto the doubled line (outside the cup) and then knot the ends to form a loop.
- Apply a line of glue along the edge of the poster board circle. Press the cup, upside down, atop the glue and hold it in place for 20 seconds or so. During the first 10 minutes of drying time, occasionally check the seal and press down gently on the cup, if required. Let the glue cure for a full day before hanging the ornament.
LAST MINUTE CHRISTMAS PRESENT

- Materials
- Old sweater
- Scissors
- Embroidery needle
- Embroidery floss
- Buttons, felt shapes, paper flowers, and other embellishments
- Instructions
- To felt the wool, wash the sweater in hot water and dry it on high heat. Repeat, if necessary, so that the fabric's weave is tight enough to be cut without fraying.
- Cut loops from the sweater's cuffs and arms. Next, decorate the bangles by using embroidery floss to sew on buttons, felt shapes, paper flowers, and more.
- Tips:
- If the diameter of a loop is too big, cut it open, trim the excess length, then overlap the edges and secure them by sewing on embellishments.
*************************************************************************
THIS IS FUN AND EASY AND WILL MAKE EVERY THING SMELL NICE.
WHAT YOU WILL NEED: COTTON FABRIC,NEEDLES PINS AND THREAD,DRIED LAVENDER FLOWERS AND DRIED RICE.
STEP 1: CUT OUT FABRIC. PU THE RIGHT SIDES TOGETHER. CUT 2 SQUARES OF THIN FABRIC 4 IN x 4IN (10 CM x10 CM). SEW AROUND THE EDGES USING BACK STICK
STEP 2: TURN THE BAG RIGHT SID OUT
STEP 3: FILL UP THE BAG DON'T STUFF IT TO FULL
STEP 4: STICK TOGETHER TO FINISH BRING THE SIDES OF THE BAG TOGETHER TO MAKE A TRIANGLE SHAPE. TURN IN THE EDGES AND STITCH THEM NEATLY TOGETHER
STEP5: FINISHING TOUCH SEW ON A PRETTY RIBBON OR TRIMMING AND STITCH INTO PLACE. IF YOU CUT YOUR TRIANGLES SMALLER YOU CAN MAKE MINI PYRAMIDS
YOUR DONE
